
Season 3: Golden Kingdom Unveiled
A sweeping desert called the Golden Kingdom awaits commanders this season, hiding long-buried mysteries, deadly foes, and potent relics.
After his earlier defeat, Noah discovered the Monument of the Dead and proclaimed himself ruler of this sun-scorched realm, raising an army of mummies and calling forth relentless sandstorms.
Alliances must venture into the new desert map to uncover its secrets, expand their territory, and counter Noah’s undead legions.
New seasonal materials—mithril, sacred water, and spice—appear across the sands and are essential for crafting, upgrades, and alliance projects.
To harness these resources, players can erect novel structures such as the Curse Research Lab, Blessing Fountain, and an enhanced Alliance Center.
Protectors, a line of powerful seasonal units, can be summoned to defend holdings and tip the balance in contested zones.
Season 3 also introduces exclusive weaponry, upgraded building options, and higher profession caps for deeper progression.
Expect larger-scale alliance warfare as guilds clash over resource-rich points and strategic positions on the desert map.
Prepare coordinated strategies: control resource nodes, deploy protectors wisely, and invest in the new infrastructure to withstand sandstorms and mummy assaults.
Servers will transition into the Season 3 pre-season roughly 6–7 weeks after Season 2 concludes, giving alliances time to ready their forces. 23 guidesA fresh chapter in the Golden Kingdom desert brings new mechanics, rewards, and alliance-focused play to master.
Primary resources and walkthroughs:
-
Quick overview of season mechanics and goals
-
Detailed week-by-week breakdowns for Weeks 1 through 8
-
What to expect at the season finale and how to maximize end-of-season gains
-
Comprehensive strategy guide covering progression, combat priorities, and alliance coordination
Event and reward highlights:
-
Celebration activities grouped by Week 1, Week 2, Week 3, and Week 4
-
Desert Artifacts progression (tiers 1–7) with tips on which upgrades to prioritize
Supporting how-to guides:
-
Professions: best choices and leveling tips
-
Sphinx locations and route recommendations
-
Tricks & tips for resource management, quick power spikes, and PvP encounters
Pre-season timing note:
When the pre-season timer reaches zero your server will transition into Season 3, but the actual start can lag behind the countdown by 10–30 minutes. Servers may begin at different scheduled times, so expect a short delay after the timer finishes before in-game events begin.
Commanders, ready your banners and call your allies—Season III: Golden Kingdom dawns, and the desert awaits.
A vast, sun-scorched wasteland of pyramids and ruins stretches before you: blistering days, freezing nights, swirling sand, and secrets buried under millennia of dust.
Beneath the dunes, colossal sandworms prowl and an ancient mummy legion stirs—an age-old curse threatens to swallow the realm whole.
At the heart of this turmoil stands Noah, the Desert Overlord, who has claimed the Monument of the Dead and awakened the doomed legions to sweep the sands in a relentless storm.
When supplies vanish and oases dry, despair spreads—but hope remains in a daring strike: Scarlett’s seizure of the monument fractured Noah’s grip and unlocked a way to summon the Protectors.
These Guardians are the key defenders against the mummy tide—powerful allies you must lead, upgrade, and coordinate to break the curse and restore the Golden Kingdom.
New strategic resources enter the fray: Mithril, a rare forging metal for elite unit upgrades, and Sacred Water, vital for sustaining oases and powering ancient relics.
Manage Mithril and Sacred Water carefully to strengthen Guardians, enhance buildings, and unlock desert-specific tech—control of these resources will decide many battles.
Season progression raises the profession cap to level 100, revealing fresh skills, tactical options, and specialization paths for commanders seeking an edge.
Expect new soldier types, desert-styled fortifications, and gameplay mechanics tailored to shifting sandstorms, oases, and monument control.
Alliances must adapt: scout frequently to detect sandworm threats, secure and defend oases to preserve Sacred Water, and establish forward posts to collect Mithril deposits.
Coordinate attack waves to overwhelm Noah’s mummy detachments, assign Guardian squads to monument defense, and rotate garrison forces to survive sandstorms.
Diplomacy and timing matter—rival commanders will hunt the same riches; joint operations and resource-sharing agreements can turn the tide of the campaign.
Prepare specialized builds for rapid mobility across dunes, siege setups to break mummy formations, and logistics teams to keep supply lines open during sandstorms.
The Golden Kingdom’s fate hangs in the balance: seize Mithril, guard the Sacred Water, lead the Protectors, and unite your alliance to reclaim the desert.
The drums of war beat across the dunes—step into Season III and write your legend in the sands.
As soon as Season 3 launches, an email will be sent to the address linked to your account.
\nPlease check your inbox (and spam/junk folder) for the notification and any follow-up instructions.
\nIf you don’t receive it within a few hours, contact support for assistance.
A slumbering power stirs beneath the shifting dunes, its awakening heralded by unnatural storms.
Noah, reforging his shattered forces, has breached the sacred pyramid to claim a relic of conquest: the Monument of the Dead.
His touch has roused ancient Protectors and unleashed a cataclysm of sand upon the Golden Kingdom.
Yet, a theft in the shadows offers a chance.
Scarlett’s intervention secured the monument, allowing us to summon these mighty beings to our side.
The battle for the desert's soul begins.
Remember:
Season-exclusive buildings, resources, and Protectors are fleeting—use them wisely.
Invest in your profession’s seasonal specializations.
Beware the sands alone; alliance territory offers sanctuary from lurking threats.
A fresh chapter is about to begin.
Look to your server's main interface, beneath the familiar Duels vs icon.
A new emblem will appear there, marking the imminent arrival.
It carries a definitive countdown: fourteen days until the pre-season commences.
Tap the item to begin downloading the Season 3 resource pack.
If those files were already fetched earlier, the download won’t run again.
Accessing a server with Season 3 features while on an older server may trigger a resource pack download.
Click any building in the new map to initiate this process.
Confirm the download to update and view the enhanced graphics.
This allows preview of the Golden Kingdom's desert terrain and visual upgrades.
Enter the Golden Kingdom's vast deserts
where Season 3 unfolds with new riches and trials
Find the event icon beneath Duel VS to begin your journey
Explore the map for Mithril and Sacred Water
fortify your base with powerful Protectors
and forge new strategies with your Alliance
For the first time ever, the upcoming season unlocks before its official kickoff.
Players can join exclusive pre-season events that preview new features and offer rewards.
This early window gives the community a chance to test, strategize, and get ahead of the launch.
The pre-season's initial week unfolds,
bringing a structured yet limited menu of events.
A seven-day Golden Realm phase sets the stage,
while Desert Blessing, now termed Season Boost, runs concurrently.
This period offers a preview of the main timeline,
with certain features remaining inaccessible for now.
Core progression — the Main Timeline is open, with Week 1 content live and a sneak peek at Week 2’s upcoming challenges.
Battle pass options — the Season Battle Pass is active, and additional passes can be acquired to boost rewards.
Seasonal events — an initial batch of limited-time events is available in Week 1; more events will roll out as the season progresses.
Purge operation — a timed PvE/PvP action where players face purge mechanics for unique loot.
Digging Stronghold Clash — a clash mode focused on excavation and stronghold control, pitting teams against each other for territory.
Sandworm Crisis — a dynamic environmental crisis that alters the map and offers special rewards for handling the threat.
Desert Bazaar — the themed marketplace with seasonal wares, trade opportunities, and rotating offers.
City Clash (Season 3) — the city-based multiplayer confrontation tailored for S3, featuring updated rules and rewards.
Open the Goals panel to reveal two mission types: personal tasks and alliance tasks.
Personal missions reward actions such as leveling up your Curse Research Lab.
Alliance missions grant rewards for cooperative efforts like greening tiles across your alliance.
Personal mission payouts are particularly generous — the most valuable rewards include:
Alliance objectives progress when desert tiles are converted into green territory.\nSecuring a city turns its surrounding tiles verdant.\nAfter capture, launch a recon plane to greenify the adjacent desert tiles.
The pre-season unfolds over seven days,
with each day presenting a new objective for the warzone to achieve.
Completing these daily goals gradually reveals the secrets of the upcoming season.
The details uncovered so far are visible here.
After you complete a goal, tap the chest icon displaying a red dot to claim the reward.
Each goal’s reward can be collected only once, so remember to click the marked chest.
Season contribution standings aggregate several performance metrics to show who contributed the most during Season 3.
View the details by going to Season 3 → Season Contributions in the menu.
Placements on this list do not automatically award prizes.
Alliance leaders (R4/R5) may use these rankings as a basis when deciding who receives extra loot.
Loot rewards originate from territories captured by the alliance and can be handed out at the discretion of R4/R5.
Exploration is one of the contribution categories tracked and influences a player’s overall season ranking.
siege:
spice war:
enemy kill:
Current confirmed details for this season:
Summary of the main points known so far.
A new alliance building arrives this season as the focal point for group activity, acting like an evolved version of last season’s furnace.
This hub appears designed to centralize alliance functions: resource conversion, shared bonuses, and coordinated upgrades.
Alongside the structure, fresh officer positions will be made available, offering designated roles such as logistics, defense coordination, and member support.
These changes push alliances toward tighter organization—appointing officers and prioritizing Hall upgrades will likely unlock stronger collective perks.
Expect strategic reshuffles as groups assign new officers and optimize the hub’s abilities to gain an early advantage this season.
Several seasonal structures appear on the map and can be upgraded to unlock new effects and bonuses.\nThe Curse Research Facility – a building dedicated to developing and improving curse mechanics and related upgrades.\nThe Fountain of Blessings – grants periodic buffs or restorative effects to nearby allies and structures.\nThe Sacred Altar – used for rituals that confer powerful advantages or long‑lasting enhancements.\nThe Protector Field – a defensive zone that bolsters the survivability of units and fortifications within its range.\nFor a walkthrough of these mechanics, check the in‑game manual; this guide also explains the same rules in detail across its various sections.
no manual available
Quick side-by-side snapshot of Season 2 versus Season 3:
Map and environment
- Season 2: Mixed terrain with familiar chokepoints and predictable movement.
- Season 3: Golden Kingdom desert map introduces open dunes, sandstorms, and terrain that favors long-range and mobile tactics.
Resources and nodes
- Season 2: Standard resource distribution with steady mithril spawns and conventional gathering points.
- Season 3: Mithril remains important but is more abundant in specific desert veins; Sacred Water appears as a new, contested resource that influences movement and unit sustain.
Protectors and defensive mechanics
- Season 2: Defensive units and structures provided straightforward area denial.
- Season 3: New Protector mechanics grant persistent buffs to held zones and create high-value targets for assaults, shifting priorities from mere defense to active zone control.
Alliance dynamics and objectives
- Season 2: Alliances focused on territory control and individual strongholds.
- Season 3: Alliances must coordinate around shared resource nodes, joint defenses for Protectors, and timed objectives tied to the Golden Kingdom, increasing cooperative play and planning.
Combat and tactics
- Season 2: Emphasis on balanced armies and set-piece battles.
- Season 3: Mobility, water control (to manage Sacred Water access), and protector-focused strikes become more effective; hit-and-run and flanking rise in value.
Progression and rewards
- Season 2: Predictable season rewards and progression paths.
- Season 3: Tiered incentives, event-driven milestones, and desert-specific prizes encourage repeated engagement and competitive alliance play.
What to adapt for Season 3
- Prioritize scouting and mobility to handle open desert.
- Coordinate with allies to secure Sacred Water and Protectors.
- Rebalance army composition toward units that exploit long sightlines and rapid repositioning.
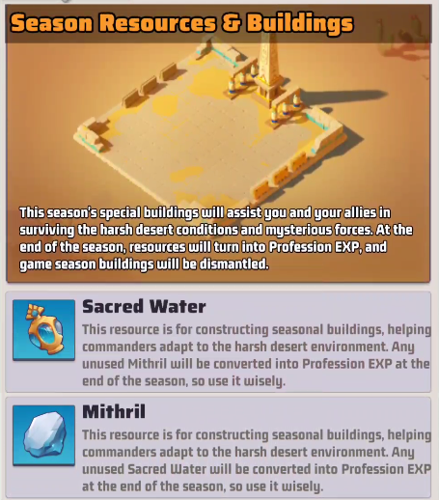
Mithril and Sacred Water
have arrived as new resources
for players to gather and utilize.
Claimed as a reward the first time you defeat a zombie on a level.
Sacred Water is a seasonal resource used to construct and upgrade event buildings.
Season 3's primary objectives have been successfully achieved.
The Golden Kingdom's harsh desert now stands as a central arena for conflict and resource acquisition.
Mithril veins and Sacred Water springs are the new strategic prizes, fueling technological and spiritual advancement for all factions.
To secure these assets, players must master the deployment of powerful Protector units across the shifting sands.
True dominance, however, will be forged through shrewd Alliance diplomacy and coordinated territorial strategy.
Unlock the secrets of the desert with new strategic resources.
Mithril is now a key material for advanced upgrades and powerful equipment.
Secure the Sacred Water Hut at the Alliance Center to gain a crucial advantage.
This vital structure provides your alliance with the unique Sacred Water resource.
Form a strong alliance and coordinate to capture and hold critical desert points.
Deploy Protectors wisely to defend your territory and resources from rivals.
The first alliance to capture a city earns special and valuable rewards.
Master the new map dynamics to dominate in this expanded season of conflict.
Mithril serves as a key resource for building and enhancing seasonal structures.
Earn this valuable material by defeating zombies for the first time, which grants special rewards.
Additionally, look out for visitors appearing before your base's wall, as they can also provide mithril.
Launch radar sweeps in the Desert Ruins to uncover hidden targets and mission nodes.
Score the day's inaugural Doom Walker takedown to gain early rewards and momentum.
Finish Season Three milestones to collect all rewards and unlock Golden Kingdom bonuses.
Focus first on capturing digging strongholds for your alliance.
'
These generate a steady hourly flow of Mithril, the season's crucial resource.
'
Prioritize securing the initial capture rewards from cities and strongholds for an early advantage.
'
The Alliance Center features a Mithril Plant, central to your resource strategy.
'
Weekly and Season Battle Passes offer the most significant progression boosts.
'
Scour the desert for treasures and unlock vaults scattered across the sands.
'
Navigate this transformed world with its distinct cities, trade posts, and digging strongholds.
In the fresh season's dawn, you and your allies awaken at the server's periphery, united in your alliance hive yet stripped of cities.
The conquest begins anew, under a transformed set of rules.
The landscape is now ruled by Egyptian-themed elite monsters, replacing the former doom elites.
A new challenge arises: most zombies now require a significantly high virus resistance to be defeated.
The battlefield is laid out on a 13×13 grid of tiles.
Each tile is 75×75 pixels, so the entire map measures 975×975 pixels.
Tiles can appear stretched in some images, but they are true squares.
A player base occupies a 3×3 tile area (225×225 pixels).
Explore enhanced strategic resources with our high-resolution map, courtesy of oorgo's craftsmanship.
Dive deeper into Season 3's dynamics through our community page, featuring specialized tools and maps to refine your capture plans and victory approaches.
Additionally, refer to the official maps subsequently released by Last War for authoritative guidance.
High-resolution versions of the two maps are available for download.
Detailed map — high-quality image
Overview map — high-quality image
Hunt for the elusive golden scarabs across the lands.
These creatures appear to be consistently at level one.
Engage them directly upon discovery to claim your prizes.
Multiple methods can trigger their emergence.
Defeating standard world zombies may cause one to appear.
Vanquishing formidable doom elites is another reliable tactic.
Deploying a trap landmine might summon random underground beings, including these scarabs.
In the vast expanse of the desert map,
keep your eyes sharp as you pan the view.
A glimmering golden scarab scuttles into sight,
its movement a fleeting dance across the sands.
Only when you launch your assault does it halt,
becoming a stationary target for your strategy.
Season 3 brings a brand-new radar mission split into two distinct phases.
First, a luck-driven scavenging phase sends you searching for random prizes.
During your search you may uncover ancient desert ruins.
At that point you can either take the loot and leave, or push onward into the ruins — but pressing forward carries the risk of losing everything you’ve collected.
Traps hidden inside the ruins can trigger a short minigame that offers a chance to earn coins.
When the minigame starts you must sprint through the corridors, grab as many coins as possible and dodge zombies.
You have a 30-second window to escape the ruins and maximize your coin haul.
The desert trials test your resolve with each attempt,
offering lessons in persistence through temporary setbacks.
Victory in the final stage rewards the fortunate with merit medals,
a testament to both strategy and serendipity.
Begin your journey at the initial challenge,
where every choice shapes the path ahead.
level 2:
level 3:
level 4:
level 5:
level 6:
level 7:
Securing the Desert Ruins in the first week yields a special triumph,
yet the Alliance Compress, a key reward for reaching Level 7, remains locked initially.
This prized strategic tool is not immediately accessible, creating a distinct early-game challenge.
Patience and further progression are required to unlock this vital asset for your alliance.
Season 3 Gameplay Overview
With 49 attempts at your disposal,
the chance to reach level seven stands at 2.016%.
Upon successfully attaining this final stage,
you may exit the ruins and claim a chest as your reward.
Seasonal structures arrive with the third chapter's launch.
Crucially, these are temporary additions to your domain.
They will vanish once the season concludes.
Invest in them only for short-term strategic gains.
Need detailed tables for levels, resource requirements, and time estimates? Refer to the Google Sheets document linked in the original post for complete breakdowns and timings.
Want additional Season 3 tools, guides, or community-made utilities? Head to the community page to explore shared resources and support.
Detailed tables for levels, resource requirements, and build times are available in the Google Sheets document: link to document.
More Season 3 utilities and community tools can be found on the community page.
Prerequisite: this building becomes constructible only after the Curse Research Lab reaches level 30.
Effect: it increases the attributes of Desert Protectors, functioning much like Season 2’s military bases (tank/air/missile) did for heroes.
Every level you add to this structure grants protectors a 0.5% boost to HP, Attack and Defense.
Stacking levels compounds this bonus—each upgrade applies another 0.5% to those three stats.
Navigate to the alliance tab, then the alliance center, and use the coordinate feature to pinpoint its location on the map.
By the second day, your alliance must establish the alliance center.
Once constructed, it generates spice per hour and grants buffs to all members within its zone of influence. It also shields those members from displacement by giant sandworms.
Please note: Spice production rates are currently under adjustment by developers; disregard any static images for these figures. Refer to the dedicated levels section for accurate data via the provided spreadsheet link.
The maximum durability for the alliance center has undergone several revisions and is currently set at 200,000.
Explore additional tools for Season 3 on the community page.
Repairing the Alliance Center progresses more quickly as additional squads contribute.
Each squad that joins the center boosts the repair rate, shortening overall build time.
Encourage allies to enter the hub so repairs complete faster and the facility returns to full operation.
Zoom out slightly on the map to reveal the Alliance Center’s buff coverage.
Backing away makes the buff radius visible so you can see which tiles are affected.
Use this view to judge how far the Alliance Center’s bonuses reach.
Once your alliance constructs the central hub,
a clear progression path becomes visible.
New functionalities and strategic options
are systematically unlocked with each level advancement.
This structure unlocks at Alliance Center level 5 and produces 34,560 mithril per hour.
Mithril must be claimed manually — open the Alliance Center screen and tap the mithril icon on the building’s construction graphic to collect.
If the structure is damaged, production will halt until it’s repaired.
Should the building be destroyed, the alliance suffers a proportional loss of spices associated with it.
Regularly check and collect to prevent wasted production and reduce risk from enemy strikes.
This structure generates 600 units of oil per hour.
It becomes operational once the Alliance Center is upgraded to Level 10.
Harvest the accumulated oil by navigating to your Alliance Center page and tapping the visible oil icon on its construction interface.
Be aware that production halts if the building sustains damage.
If the structure is destroyed, your alliance will forfeit a portion of its stored spices.
Open the Alliance Center screen and click the Sacred Water icon on the building’s construction panel to collect accumulated Sacred Water.
The Sacred Water building becomes available once your Alliance Center reaches level 15.
When active, it produces 8,640 units of Sacred Water every hour.
If the building is damaged, production pauses; if it’s destroyed, the alliance loses a corresponding percentage of its spices.
Unlocking this structure requires an Alliance Center at level 20, enabling a production rate of 6 Protector Horns per hour.
Collection is performed directly from the Alliance Center interface; locate and click the Protector Horn icon displayed on the central construction graphic.
Be aware that any damage to the building will halt all production immediately. If the building is destroyed, your alliance will suffer a permanent loss of a corresponding portion of its total spices.
Alliance Center rank increases automatically according to the total spice collected by your alliance.
A community-maintained spreadsheet contains the detailed stats and attributes for each level for reference.
For additional Season 3 utilities, guides, and tools, check the community page.
You can move the Alliance Center to a new location.
Simply erect a relocation spot at the desired site—this uses the same construction step as when you first set up the Alliance Center.
The process mirrors how the Alliance Furnace was relocated during Season 2.
When establishing a new alliance center location,
the initial placement is permanent and requires full construction at that site.
Upon completion, the alliance center can be transferred there,
but the structure becomes vulnerable to enemy assaults.
During the building phase, it remains shielded from attacks.
Once construction finishes at 100%, this shield is removed.
If the durability is reduced to zero,
the relocation spot is eliminated, allowing a fresh start elsewhere.
A damaged but standing completed spot prevents relocation until fully repaired.
Leaving it idle post-completion risks enemy harassment,
potentially trapping the alliance—unable to utilize or replace it without repairs.
Similar to past seasons, defeating doom elites may trigger temporary resource tiles.
Season 3 introduces tiles for sacred water, mithril, and oil,
each supporting up to ten gathering squads.
The appearance rate for these tiles after monster eliminations isn't specified this season,
contrasting with Season 2's 5% chance.
Spice production is now the key to victory this season.
The higher a city's level, the greater its spice yield.
Securing these cities is the core objective of the City Clash event.
City spice output increases with each upgrade level.
Level 1 provides a base rate of 100 units per hour.
This production doubles to 200 per hour at Level 2.
Advancing to Level 3 yields 300 units each hour.
At Level 4, the hourly generation rises to 400.
Level 5 further increases the output to 500 per hour.
The maximum upgrade, Level 6, produces 600 units hourly.
Total: four cities have reached Tier 6 status.
Arrangement: a compact cluster—two positioned to the north, one on the eastern flank, and one to the southwest.
Tactical implications: close proximity allows rapid mutual support but increases exposure to area-effect assaults.
Recommended actions: diversify supply lines, stagger defensive rotations, and avoid concentrating key assets where a single strike could cripple all four.
Goal: secure and maintain at least two Tier-6 strongholds while upgrading nearby outposts to absorb pressure.
In the northwest corner of the desert map,
alliances must secure their flank.
This upper-left quadrant is a critical zone
for strategic positioning and resource control.
Vigilant scouting here is essential
to anticipate enemy movements from the west.
Establishing a stronghold in this region
provides a defensive advantage for your territory.
Control this area to dominate the northern approaches
and safeguard your alliance's interests.
In the northeastern quadrant of the map,
players will find a zone rich with strategic resources and formidable challenges.
This upper-right region is crucial for securing advanced materials like Mithril,
which are essential for upgrading high-tier units and structures.
Alliances must coordinate carefully to control these territories,
as they are often fiercely contested.
The area also presents unique environmental hazards,
requiring specialized tactics for both offense and defense.
Lower-left corner — the map’s southwest quadrant.
Positioned at the bottom-left.
The southeastern quadrant of the map, towards the lower right corner,
holds strategic value for resource control and territorial expansion.
Positioning here can offer advantages in late-game conflicts and alliance maneuvers.
Alliance leaders can declare up to two city wars each day
A maximum of eight cities can be held by an alliance at one time
For resource strongholds, the daily capture limit is set at two
No alliance may control more than eight digging strongholds simultaneously
Digging strongholds are map nodes that continuously produce mithril — think of them as the evolved version of Season 2 dig sites.
Each stronghold is defended by mummy sentinels and Golden Annihilators, with defender strength scaling up as the stronghold level increases.
Following the latest update, mithril output is fixed by level as follows:
Level 1 — 100 mithril/hour
Level 2 — 120 mithril/hour
Level 3 — 140 mithril/hour
Level 4 — 160 mithril/hour
Level 5 — 180 mithril/hour
Level 6 — 200 mithril/hour
Higher-level strongholds grant larger hourly yields but require stronger forces (or allied support) to overcome their tougher protectors.
level 1:
level 2:
level 3:
level 4:
level 5:
level 6:
Three distinct golden beasts stand guard at the digging strongholds.
Tap the "i" icon to view their specific details.
Golden Annihilator — missile class
Golden Striker — aircraft class
Golden Defender — tank class
In the alliance interface, navigate to the cities section.
Locate your digging strongholds and access them to gather resources.
Mithril can be claimed collectively using the 'claim all' function for efficient collection.
This streamlines resource management directly through your alliance's operational hubs.
Trade posts are distinct from strongholds or cities; they serve a different purpose on the map.
They sit along diagonal routes that lead toward the capitol and come in upgradeable tiers, maxing out at level 5.
Individual players can occupy a trade post, which activates an in-game market accessible to all.
Owners collect tax revenue from their posts while the market remains available to everyone.
There’s no requirement to control neighboring tiles to hold a trade post, and you can technically possess an unlimited number.
However, trade posts are not permanent — other players can seize them, so defending your holdings is essential.
Because they are vulnerable to capture, a single player usually struggles to effectively control a large number of trade posts at once.
Trade posts unlock in stages, with each level becoming available at a specific server time.
The schedule begins on the Sunday of the second week.
Subsequent levels open on Monday, Tuesday, Thursday, and Friday of the third week.
Be vigilant, as these posts are vulnerable to capture by rival warzones.
When a contest initiates, it lasts for precisely one hour.
Stationed troops will incrementally increase your capture percentage over this period.
Progress is individually tracked for you and your alliance members.
To claim the post, a commander must first achieve 100% progress.
If no one reaches full capture, the highest progress among attackers wins, provided the post is ungoverned.
Your base must be located within the trade post's contaminated territory to launch an attack.
An existing governor will maintain control if the 100% threshold is not met by any challenger.
After a successful capture, a seven-day cooldown period begins before the next contest.
Each post operates as an independent marketplace for commanders within the same seasonal server group.
On the map, these structures appear as distinct, capturable points of interest.
A trade outpost awaits its fate, vulnerable to conquest.
Higher-tier trade posts expand their available inventory.
While other factors remain consistent,
the governor's ability to raise the protector cap sees a progressive enhancement.
Upon capturing a trade post, the governor unlocks its store for resource exchanges.
Access the marketplace by selecting the post and tapping the store icon.
A single caravan can be summoned to refresh the available inventory.
Stock is limited and shared alliance-wide, operating on a first-come, first-served basis.
Certain premium items are restricted to the governor's exclusive use.
This special deal remains locked
until you command the trading hub.
A tap brings a clear reminder
of this exclusive leader's right.
The trap landmine refills had sold out,
leaving only other items still available for purchase.
As shown in the image,
I arrived too late to secure any.
Season 3 brings a desert-themed update with plenty of new gameplay elements to explore.
Expect features like the sandwork crisis, Desert Protectors, building an oasis, recovering desert artifacts, doom walkers roaming the dunes, and heavy-duty trucks for transport.
Cat base skins are interactive this season: locate skins in the game and tap the like button to claim instant rewards.
Note that likes are limited each day, so use them strategically.
Economy changes at trade posts: when players spend diamonds there, a portion is collected as tax.
If a trade post sells out or its governor abandons it, the collected tax is converted into a golden egg and awarded to that trade post’s governor.
That golden egg can then be distributed or shared with other players via chat.
The desert sands conceal ancient threats in this new season's conflict
Alliance strategies must adapt to the shifting dangers beneath the dunes
A fourteen-day crisis begins immediately
where coordinated hunting yields valuable resources
Battles generate tremors that awaken lurking creatures
filling a hidden progress bar with each engagement
The final strike summons a serpent from the depths
targeting the commander's own stronghold
Smaller worms immobilize outbound forces
though teleportation offers escape at a cost
forfeiting potential rewards in the process
rally marches alone continue unimpeded
Victory against these beasts brings discovery bonuses
delivered directly to the targeted commander
Greater threats emerge as the event progresses
massive worms that displace entire bases
from their positions beyond the alliance core
Abandoning your alliance resets your accumulated resonance
leaving you isolated from both peril and opportunity
Unseen on standard tracking interfaces
colossal sandworms lie waiting in trap-laden territories
ensnaring the unwary in their subterranean domains
Rewards shown as "possible loot" appear as chests on the map, spawning near the spot where the sandworm was killed.\nWhen commanders damage monsters, shockwaves attract nearby small sandworms; a shared progress bar fills with each pulse, and when it reaches full the last commander to advance it will draw a sandworm that wraps around them.
A daily cap limits loot drops to 30 items.
So you can gather at most thirty loots per day—prioritize the most valuable ones.
Large sandworms are significantly tougher than their smaller counterparts.
Coordinate multiple rallies to defeat a large sandworm rather than attacking solo.
Discovering one grants the finder valuable sandworm scales as a reward.
A massive sandworm surfacing directly under your base can catapult your settlement to a distant location on the map.
If your base is moved, an on-screen notification will appear to inform you of the event.
To minimize the chance of displacement, remain within your alliance’s controlled zones.
The alliance center provides protective buffs inside its territory that help guard against sandworm relocation.
Engage in daily sandworm battles for consistent loot drops.
Pursue set objectives to unlock extra bonuses and resources.
Strategic encounters yield valuable rewards for persistent players.
Beyond the usual small and large sandworms, the desert hides enormous, city-shaking behemoths.
You can catch these giant sandworms by laying Trap Landmines — a seasonal skill that lets you set hidden snares across the sands.
When a colossal worm crosses a planted mine, the trap triggers and drags the creature to the surface, leaving it exposed and vulnerable.
That’s when alliance coordination matters: converge on the captured worm with your allies to deliver the finishing blows and claim the rewards.
The sandworms dwarf entire cityscapes, rising above buildings and dominating the skyline.
Their emergence clears out nearby zones, leaving the surrounding area eerily abandoned.
Left alive, a sandworm will eventually vanish on its own after five hours.
An Alliance Center grants protection to members inside alliance territory, preventing sandworm knockback.
A new unit type, Desert Protectors, debuts in Season 3 and becomes available immediately when the Ancient Tech — Protector’s Field event unlocks (Day 1, Week 1).
These units are created by converting fallen troops rather than through the usual training queues, making them largely independent of spending or training level; they are single-use and disappear after deployment.
You can place the Protector’s Field just outside your base wall once the event is active, which enables production and use of Desert Protectors.
Note about tiers: there is currently no Tier-11 variant for these units; a T11 version may be introduced in a future update.
Early-season upgrade advice: raise the Protector’s Field only to level 10 at first. Level 10 already grants the full functionality of Desert Protectors; level 11 requires Mithril and Sacred Water—resources that are better reserved for other seasonal buildings during the opening days.
For full stats and level-by-level attributes, check the community spreadsheet and Season 3 tools page for detailed references and guides.
The seasonal outpost can be upgraded like any other structure, and doing so unlocks the interface for configuring Desert Protectors.
When you switch from base view to the global map, you can also open the Desert Protectors panel via a dedicated shortcut icon positioned just above the truck and secret-mission buttons.
The desert's blessing grants these protectors formidable strength,
surpassing standard units of equivalent level.
Before deployment, their icon reveals the immediate count available for use.
Each hero may command a force of protectors,
limited to one-tenth of their total unit capacity.
Even with this restriction, their power outmatches ordinary soldiers.
Once committed to battle, protectors do not return to your ranks;
they vanish back into the sands.
Therefore, strategic deployment is crucial.
If deployed but avoid combat entirely,
all protectors will safely withdraw.
Desert Protectors Overview
The power of your garrisoned Desert Protectors unlocks progressive skills.
These elite units boast formidable enhancements:
+250 Curse Resistance and a 25% boost to Attack, Defense, and HP.
They are the ideal force to breach enemy lines where your standard curse resistance falls short.
Any army marching with a Protector automatically benefits from these active buffs.
In player versus player combat, when a formation equipped with Protectors is overcome,
a retaliatory effect is triggered based on the vanquished guardians.
The enemy force will suffer losses to a segment of its own units,
with the scale of this counter-strike determined by both the quantity and the tier of your fallen Protectors.
Inflict the blue flame curse upon a rival commander's base with a successful assault using Protectors.
This spell engulfs the enemy stronghold in unquenchable azure fire for a full hour.
Master specialized skills to unlock even more devastating and powerful curse effects.
Allied participants must field squads equipped with protectors to join these special rallies.
There is a 60-second preparation window before a protector rally launches.
The rally commander’s active protector bonuses extend to every squad within the rally.
Joining or initiating a protector rally grants an additional 3× movement speed boost.
Note: only squads carrying protectors are eligible to join, so plan deployments accordingly.
Ten percent of units lost in certain situations are moved into a protector conversion reserve.
They enter this reserve when losses occur from:
- combat casualties (for example, duels),
- severely wounded troops that cannot be admitted because the hospital is full,
- casualties from drill-ground breaches.
There is no limit to how many units can accumulate in the conversion reserve.
Allied players must send a recon plane to initiate conversion for each unit in the reserve.
Once converted, those units are deployed to the protector’s field.
A side-by-side comparison is shown between standard soldiers and their Desert Protector counterparts across several variants.\n
Keep in mind: Desert Protectors located within their protective field are not affected if your base is breached.\n
They remain active and unharmed even after enemy forces break through your defenses.\n
The examples provided correspond to Level 10 units.
level 9
level 7
The event activates when level 1 cities unlock on Day 3 of Week 1 and remains active through the end of the season.
"The silent expanse holds a spark of renewal; those who dare can coax life back into the oasis."
Altar: a newly introduced structure that enhances the attributes of Desert Protectors, boosting their combat performance and survivability. Details on its mechanics are available in the Altar documentation.
Greenification mechanics:
You may only convert sandy tiles that border already greenified territory — expansion must proceed from existing verdant patches.
As the season advances, your allowable greenification reach widens, letting you push farther into the dunes.
When 80% of a region has been transformed, that region is marked as complete and its completion contributes to overall warzone progress.
Converted areas can occasionally reveal Desert Artifacts — rare treasures hidden beneath the sand.
Each region contains a predetermined number of these artifacts; not every green tile will yield a find.
The initial phase focuses on establishing a foothold,
as capturing a city creates the first greenified zone from polluted land.
This early growth excludes key strategic points entirely.
In the subsequent expansion period,
the process becomes systematic and far-reaching.
Commanders methodically greenify from basic regions upward,
progressing through cities and critical objectives.
Advancement to higher tiers,
including the ultimate capitol,
is gated by achieving significant completion in the prior level.
The scope of influence then broadens dramatically,
allowing environmental reclamation efforts
to extend freely across all interconnected warzones,
uniting the seasonal battlefield under a single strategic front.
Greenifying territory expands from existing green tiles, starting around captured cities.
New zones unlock progressively as described in earlier stages.
Desert artifacts function like the supply collections from Season 2.
Refer to the dedicated guide for detailed artifact information.
Doom Walkers introduce new challenge levels in Season 3.
For newer servers, their schedule is:
After entering Season 1 off-season, levels 200, 210, and 220 unlock.
After entering Season 2 off-season, levels 230, 240, and 250 unlock.
Securing the first daily kill on these bosses is crucial.
It grants substantial rewards of scarce resources, including Mithril.
Supply caravans in the desert update received new visual skins.
The update changes only how they look—no modifications to speed, armor, cargo capacity, or combat performance.
These cosmetic options allow players to personalize their fleets and boost immersion.
They do not provide any gameplay advantage or alter match balance.
Season 3 brings staggered releases for heroes and weapons, so availability will vary over time.
The standout addition is the Hero Swap event — a system that lets you transfer both a hero’s EXP level and star rating to another hero.
This event goes live in week 2 and enables exchanges between two heroes, making roster reshuffles much easier.
At season start each player is granted two swap vouchers, allowing two immediate swaps.
Use this to optimize builds, fix duplicate pulls, or accelerate a favorite hero without regrinding.
Check the in-game event details for exact rules, limitations, and timing.
To advance your character,
access the promotion feature
on either Mason or Violet.
The season three launch brings back the Legend Returns event.
Utilize your hero return tickets immediately upon reset.
This grants bonus resources like mithril and sacred water from the start.
Prepare for Day 3 of Weapons of Legends (Season 3).
The server reset is set for 2 days and 5 hours from now — 53 hours total.
A free recruitment will become available once that reset completes.
The battlefield evolves with the arrival of exclusive armaments for key commanders.
New strategic tools emerge for Marshall, Schuyler, and McGregor.
Discover the intricacies of Marshall's unique armament within this comprehensive guide.
Delve into the intricacies of Schuyler's unique armament.
Explore its specific attributes and strategic applications in battle.
Learn how to optimize its potential within your overall combat approach.
Explore an in-depth breakdown of McGregor's exclusive weapon.\nThis guide details its design, standout features, performance, and real-world applications.\nYou'll find historical context, comparisons with similar weapons, and practical tactical tips.\nRead on for a clear, complete overview of everything you need to know.
Season 3 raises profession level caps to 100, introduces new abilities, and expands strategic options for character builds.
Note that the Diplomat profession is not part of Season 3’s roster.
For a complete breakdown of professions and their skills in Season 3, consult the dedicated Season 3 professions guide.
Defeating sandworms rewards sandworm scales, obtained from loot chests dropped on kill or as objectives in sandworm crisis events.
Sandworm scales can be traded at the Desert Bazaar for high-value consumables and gear that impact progression.
The Desert Bazaar refreshes weekly; as new missions unlock, additional items become available week by week.
This guide enumerates the Bazaar’s weekly offerings and includes brief notes on each special item (items rotate through the season).
The Desert Bazaar remains open for the full duration of Season 3, including the final Week 8 period.
A visual showing the quantities of Mithril and Sacred Water would be useful — I’ve already redeemed mine, so an image from an unclaimed account may be needed.
Access your inventory to deploy protector horns directly, without any confirmation prompts.
Each horn will summon a desert protector within your designated protector's field.
Protector horns can be activated straight from your inventory—there is no confirmation step, so exercise caution when using them.
Each horn summons a desert protector into your protector field upon use.
Double-check your intent before triggering a horn, since the action occurs immediately.
The desert compass offers a swift solution
for locating hidden desert vaults instantly
when engaging in archaeology and digging events
Breaking blocks within the desert vaults requires this item,
unlocking the chance to discover hidden relics with each use.
Refill applied to the Trap Landmine ability: charges restored and cooldown reset for immediate redeployment.
Use this refill to top up remaining detonations so you can lay traps back-to-back during skirmishes.
Best used to fortify choke points, secure resource routes, or create surprise ambushes on the desert map.
A full, step-by-step guide showing optimal placement, timing, and combos with Protectors and Sacred Water will be published soon.
Check back shortly for practical tactics and example setups to maximize the skill’s effectiveness.
During the Desert Treasure event (listed as "Archaeology & Digging" on the timeline),
a Desert Compass serves as a special device that instantly reveals the location of a vault hidden in the dunes.
Use it to pinpoint desert vaults without having to search manually.
Breaking desert vault blocks reveals relics,
with each item unlocking a path to hidden treasures.
Season 3 introduces a new battle pass system, essential for gaining a strong start.
This pass provides crucial resources to empower your heroes over its 48-day duration.
Similar to previous seasons, it is a key tool for progression.
Acquiring it grants significant advantages through valuable seasonal goods.
Mithril is highlighted as one of the most valuable rewards.\n\nThe battle pass is split into three tiers:\n- Free tier: items appear in the first rewards column.\n- Advanced pass (~€11.99): unlocks rewards in columns two and three.\n- Season Luxury (~€23.99): grants access to columns four and five.\n\nEach tier expands the number and quality of obtainable items, with mithril being a key prize.
The in-game pass system requires separate purchases for distinct reward tracks.
To obtain both the Advanced and Luxury tier items, you must acquire both passes individually.
Opting for either the Advanced or Premium pass activates a crucial feature: double daily task rewards.
After claiming the standard reward, a 'claim more' option appears, granting the payout a second time.
For optimal gain, secure your pass immediately upon the season's launch.
Delaying this purchase means forfeiting those valuable double rewards, which are essential for accruing combat readiness points and progressing through the season's content.
This walkthrough summarizes the season’s offerings: tiered point rewards, daily objectives, target challenges, and the bonuses tied to premium tiers.\n\nRewards tables and point milestones (for both free and paid tracks) are explained in the video, including which prizes you earn as you climb.\n\nDaily missions provide steady progression while target missions act as milestone goals that unlock larger payouts.\n\nThe premium (advanced/luxury) pass delivers extra prizes and perks — the guide breaks down each bonus reward.\n\nThe season runs for 48 days, and the premium pass can be purchased any time during that period.\n\nOnce activated, the pass remains valid for 7 consecutive days and grants access to an exclusive additional Blessed Fountain and its benefits.
Duration and timing:
This weekly pass is active for 7 days and becomes available on day 4 of week 1.
One-time benefits (granted when you activate the pass):
- 20,000 mithril (one-off)
- 500 VIP points
- An extra blessed fountain that generates sacred water while the pass is active
- Immediate +250 curse resistance boost (temporary)
- Increased marching speed (temporary)
Daily rewards (received each day during the 7-day period):
- 50 Protector Horns
- 50 Stamina
- 20,000 mithril
- 60 generic 5-minute speed-up items
Temporary effects:
- The sacred water production from the extra fountain only lasts while the weekly pass is active.
- The +250 curse resistance and the marching speed bonus both expire when the pass ends.
Purpose and Marshall weapon mechanics:
- The primary aim of this pass is to grant access to Marshall shards, and more importantly to shards for Marshall’s exclusive weapon.
- Marshall has a brand-new dedicated weapon that must be activated with Marshall-specific weapon shards.
- Universal weapon shards cannot activate this exclusive weapon; they may only be used afterward to raise the weapon’s level once it’s been unlocked.
This 7-day Marshall exclusive weapon battle pass kicks off on day 4 of week 3.
The pass is designed to grant access to Schuyler’s character shards and, more importantly, shards for Schuyler’s new exclusive weapon.
Important: you must use dedicated Schuyler weapon shards to unlock the exclusive weapon; universal weapon shards can only be applied afterwards to level it up.
The accompanying video shows full details of the Marshall weapon battle pass and offers a preview of the exclusive weapon’s attributes.
Included rewards (highlights):
1 Alliance Epic Chest
70 Marshall exclusive weapon shards
30 Marshall shards
16 Epic Resource Choice Chests
4 Legendary Resource Choice Chests
4 Skill Medal Lucky Chests
7,000 Skill Medals
Unlocking the full potential of a commander often hinges on their exclusive armament.
A dedicated battle pass provides a direct path to these powerful tools.
For a limited seven-day window, beginning on a specific date, this pass becomes available.
Its primary rewards are focused entirely on a single hero and their new signature weapon.
The pass contains shards for the commander themselves, alongside crucial exclusive weapon shards.
Additional resources like skill medals and choice chests complement the core offerings.
It is vital to note that universal weapon shards cannot initiate the weapon's activation.
They are reserved solely for enhancing the weapon's level once it has been unlocked.
This mechanism ensures dedicated pursuit of the commander's unique battle gear.
Included rewards and items:
1 Epic Alliance Chest for alliance milestones
70 McGregor exclusive weapon shards
30 McGregor hero shards
7,000 Skill Medals
Choice and mystery chests:
4 Legendary Resource Choice Chests
16 Epic Resource Choice Chests
4 Skill Medal Lucky Chests
Battle pass / weapon notes:
The battle pass contains McGregor’s exclusive weapon; a video walkthrough shows the full battle pass rewards and previews the weapon’s stats and attributes.
Mithril pack purchase info:
During week one you can buy Mithril packs even if the UI shows availability as "1" — purchases are repeatable.
Each subsequent pack increases in cost and in Mithril amount; approximate purchase tiers are $5, $10, $20, and $50 (amounts scale roughly by doubling).
This season rolls out new buffs that apply to specific base skins, decorative items, and heroes.
Important clarification: when you see "Eternal Pyramid" in the boost list, that refers to a decoration item—not a base skin.
The base skin that resembles a pyramid is actually called "Dominance Sanctuary" and can be purchased in the season store.
The only base skin granting a season buff is the cat skin "Meow-lody."
This new feature is important because the primary rewards are Sacred Water and Mithril.
The mechanics operate just like the daily quest tasks you've known since the game's early stages.
Here are example objectives from the current roster:
The seasonal milestones have made a return,
providing a familiar structure for tracking progress.
Navigate to the alliance interface and select the season milestones
to access these objectives and collect your rewards.
This section also offers valuable clues
about upcoming events and challenges in the current season.
Alliance rewards are distributed based on tier achievement,
with conditions assessed at the season's conclusion.
Faction rewards operate under a separate system.
Upon meeting a tier's requirements,
a ribbon-adorned trophy icon will appear,
signifying your qualification for those final rewards.
The battlefield shifts once more, its sands concealing new fortunes.
Victory and defeat are but two sides of the same coin in this conflict,
with each faction's struggle promising its own form of reward.
Most items in this season’s shop match what was offered previously.
The entire Season 2 selection has been carried over unchanged.
One new entry joins the roster: the Glacial Palace.
In short, you get the same lineup as Season 2 with the Glacial Palace added.
Base skins change the look and feel of your settlement, from subtle texture swaps to fully remade structures with unique animations and ambient effects.
Skins fall into tiers — Common, Rare, Epic, and Legendary — each tier adding more visual detail and sometimes small utility perks like production speed boosts or defense buff icons on the HUD.
Desert-themed options dominate Season 3, including sandstone motifs, wind-sculpted dunes, and sun-baked mosaics that evoke the Golden Kingdom’s arid vistas.
Signature skins include the Mithril Citadel, which glitters with pale metal inlays; the Sacred Water Shrine, featuring flowing fountains and blue glass accents; and multiple Protector Stronghold variants with armored facades and guardian statues.
Some skins are purely cosmetic, while others grant minor stat bonuses — for example, oasis-style skins may increase food output, and Mithril finishes can slightly speed up smithing or troop training.
Acquisition paths vary: seasonal battle-pass rewards, limited-time shop bundles, event chests, alliance milestone prizes, and crafting using materials like Mithril Shards or Sacred Water Tokens.
Rarity affects availability; Legendary skins are often gated behind premium passes or high-level alliance achievements and come with exclusive emotes or base-wide lighting effects.
Mix-and-match is supported on many bases — you can apply different skins to walls, gates, and central keep to create a personalized theme that also signals your playstyle to rivals.
Strategic uses include hiding high-value production buildings within ornate defenses to deter raiders visually, or equipping Protector-themed skins near choke points to emphasize defensive intent.
When choosing skins, weigh aesthetics against any modest bonuses: if you’re focused on short-term resource farming, pick production-boost skins; for alliance play and prestige, prioritize legendary or themed sets.
Keep an eye on rotating shop offers and alliance events — skins that appear once may return in future seasons or be craftable from event leftovers, so plan your currency spending accordingly.
What are Last war: Survival and Last War: Survival Hot Package?
Last War: Survival Hot Package is the premium currency used to acquire rare heroes, powerful equipment, and speed up base development within the immersive survival game. Players can obtain this valuable resource through top-ups on various trading platforms like Codashop and Midasbuy. Utilizing the Last War: Survival Hot Package effectively can give survivors a critical edge in building their army and securing their shelter against the undead hordes.
'
Why Choose LootBar.gg to top up Last War: Survival?
If you're looking to top up Last War: Survival Hot Package, you might want to consider the lootbar game trading platform for a seamless and rewarding experience.
At lootbar.gg, players can enjoy a host of benefits, including competitive pricing with discounts that can significantly reduce costs. The platform provides a secure environment for purchasing in-game items, ensuring that every transaction is protected. Moreover, it offers a variety of payment methods and round-the-clock customer support, making the recharge process convenient and reliable for gamers worldwide.
By choosing lootbar, you not only gain access to affordable top-ups but also enhance your gameplay with resources like last war gold bricks, all while being part of a vibrant community hub that shares tips and events.
How to top up Last war: Survival at Lootbar.gg?
To complete a last war top up on the LootBar trading platform, start by accessing your LootBar account—if you’re new, create one quickly with your email or social media. Once logged in, find the top-up section for Last War: Survival by navigating through the main menu. Browse through the available Hot Package options and select the one that best fits your needs. Hit the “Top-up now” button to proceed.
Next, choose your preferred payment method from the available options and click “Pay Now” to make a secure transaction. After your payment is confirmed, you will be asked to provide your game account and password so the purchased Hot Package can be credited directly to your Last War: Survival account. Following these steps ensures a smooth and hassle-free last war top up experience on LootBar.
What is the best Gaming Top-Up Platform?
As a trusted choice for gaming top-up, LootBar offers both top speed and affordability. The platform has earned a reputation as the best platform for gaming recharge, supported by outstanding customer feedback—4.9/5.0 on Trustpilot.