
How to Create Vector Art
Introduction
Have you ever seen a logo that looks perfectly sharp on everything from a business card to a giant billboard? That’s the power of vector art.
Unlike blurry images that lose quality when resized, vector graphics stay crisp and clean no matter how big or small they become. That’s why vector art is widely used for logos, embroidery designs, t-shirts, stickers, branding, and digital illustrations.
The good news is you do not need to be a professional artist to learn how to create vector art. With the right techniques and a little practice, beginners can create polished, professional-looking designs surprisingly fast.
In this guide, you’ll learn the basics of vector art, how the process works, and practical tips to improve your designs step by step.
What Is Vector Art?
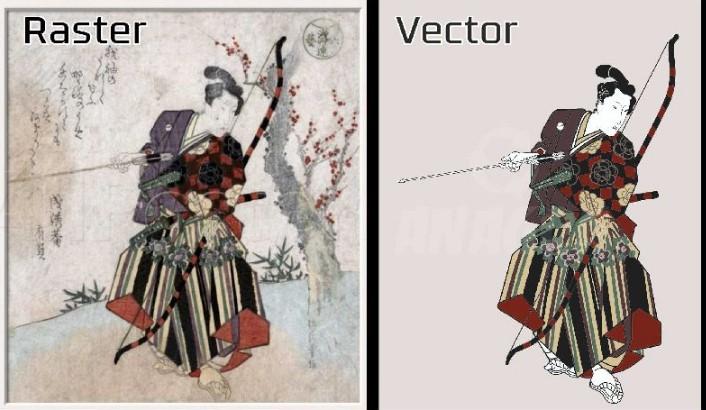
Vector art is digital artwork made from lines, curves, shapes, and points instead of pixels.
Because vectors are mathematically created, they can scale infinitely without losing quality.
Common Uses for Vector Art
- Logo design
- Embroidery artwork
- Business branding
- T-shirt graphics
- Stickers and decals
- Social media graphics
At Digitizing Buddy, vector files are especially useful because clean vector artwork helps improve embroidery digitizing quality and production accuracy.
Why Vector Art Matters
Vector graphics are important because they offer flexibility and professional quality.
Imagine printing a tiny logo on a pen and then enlarging it for a storefront sign. A normal image might become blurry, but vector artwork stays perfectly sharp.
Benefits of Vector Art
- Scalable without quality loss
- Easy to edit
- Clean and professional appearance
- Ideal for printing and embroidery
- Smaller file sizes compared to high-resolution images
Tools Needed to Create Vector Art
Before you start, you’ll need vector design software and a basic understanding of design tools.
Common Vector Design Tools
Most vector software includes:
- Pen tool
- Shape tool
- Text tool
- Color palette
- Layer controls
- Path editing tools
These tools help create smooth lines, shapes, and detailed artwork.
How to Create Vector Art Step by Step
Step 1: Start With a Simple Sketch
Every great design begins with an idea.
You can sketch on paper or create a rough digital draft before turning it into vector art.
Beginner Tip
Start with simple objects like:
- Icons
- Letters
- Basic logos
- Cartoon shapes
Simple designs are easier to trace and edit.
Step 2: Open Your Vector Software
Once your sketch is ready, import it into your vector design program.
Reduce the sketch opacity slightly so it becomes easier to trace over.
Step 3: Use the Pen Tool Carefully
The pen tool is one of the most important vector design tools.
It allows you to create smooth paths and curves by placing anchor points.
Helpful Tips for Using the Pen Tool
- Use fewer points for smoother curves
- Zoom in while tracing details
- Adjust handles slowly for better control
At first, the pen tool may feel awkward. Most beginners struggle with it initially, but practice makes a huge difference.
Step 4: Build Shapes Layer by Layer
Instead of drawing everything at once, focus on one section at a time.
Think of vector art like building a puzzle. Small pieces eventually come together to form the full image.
Common Shape Types
- Circles
- Squares
- Curved paths
- Polygons
Layering shapes helps create cleaner artwork.
Step 5: Add Colors and Gradients
Once your outlines are complete, start adding color.
Color Tips
- Stick to a simple color palette
- Use contrasting colors for visibility
- Avoid overly complicated gradients
Clean color choices usually create stronger designs.
Step 6: Refine the Details
After the main artwork is finished, zoom in and check for:
- Uneven lines
- Misaligned shapes
- Rough edges
- Extra anchor points
Small adjustments can dramatically improve the final result.
Step 7: Save in Vector File Formats
Always save your artwork in editable vector formats.
Common Vector File Types
- SVG
- EPS
- AI
These formats keep your artwork scalable and editable for future use.
Tips for Better Vector Art
Keep Designs Simple
Many beginners try to add too much detail.
Simple designs often look cleaner, stronger, and more professional.
Learn Keyboard Shortcuts
Shortcuts can speed up your workflow significantly.
Even learning a few basic commands can save hours over time.
Practice Tracing Real Objects
Tracing simple objects is a great way to improve your line control and shape accuracy.
Try tracing:
- Coffee cups
- Leaves
- Shoes
- Simple logos
It’s excellent practice for beginners.
Use Layers Properly
Organized layers make editing much easier later.
Example Layer Structure
- Sketch layer
- Outline layer
- Color layer
- Text layer
Good organization prevents confusion during complex projects.
Common Mistakes Beginners Make
Using Too Many Anchor Points
Too many points can create rough, uneven curves.
Smooth paths usually require fewer points than beginners expect.
Ignoring Alignment
Poor alignment makes designs feel unbalanced.
Use guides and snapping tools to keep everything clean and symmetrical.
Overcomplicating the Artwork
Detailed designs can become difficult to print or embroider properly.
At Digitizing Buddy, clean vector artwork helps create smoother embroidery digitizing results and better stitch quality.
How Vector Art Helps Embroidery Digitizing
Vector art is extremely valuable for embroidery because it provides clean outlines and scalable graphics.
Good vector artwork helps digitizers:
- Create accurate stitch paths
- Improve embroidery quality
- Reduce production errors
- Maintain consistent branding
The cleaner the vector file, the smoother the embroidery process becomes.
Conclusion
Learning how to create vector art may feel challenging at first, but it becomes easier with practice and patience. The key is to start simple, focus on clean shapes, and gradually build your skills over time.
Vector graphics are powerful because they stay sharp, flexible, and professional across all types of projects—from logos and branding to embroidery and printing.
With the right approach and consistent practice, anyone can create impressive vector artwork. And when paired with professional embroidery solutions from Digitizing Buddy, high-quality vector files can lead to cleaner digitizing and better embroidery production.
FAQs
What is vector art used for?
Vector art is commonly used for logos, branding, embroidery designs, illustrations, signs, and printed graphics because it can scale without losing quality.
Is vector art hard to learn?
Not necessarily. Beginners can learn basic vector design with practice, simple projects, and consistent use of design tools.
Why is vector art important for embroidery?
Vector artwork provides clean outlines and scalable graphics that help create accurate embroidery digitizing files.
What file format is best for vector art?
Popular vector formats include SVG, EPS, AI, and PDF because they preserve scalability and editing capabilities.
Can I create vector art from a photo?
Yes. Many designers trace photos or convert images into vector graphics using vector design tools and manual editing techniques.